Unlock Flavor: Easy Steps to Make Turmeric Powder from Fresh Roots
Imagine the vibrant golden hue and earthy aroma of pure turmeric, knowing it's free from additives and preservatives. This isn't just a fantasy; it's a satisfying reality you can achieve right in your own kitchen. Learning how to make turmeric powder at home from fresh roots is a surprisingly simple and rewarding endeavor, transforming humble rhizomes into a culinary and wellness powerhouse. Say goodbye to store-bought uncertainty and embrace the unparalleled freshness and potency of homemade golden spice.Why Embrace Homemade Turmeric Powder?
In a world filled with processed foods and questionable ingredients, the appeal of homemade essentials is stronger than ever. Making your own turmeric powder offers a multitude of benefits that extend beyond mere convenience:- Unmatched Purity and Potency: When you make turmeric powder at home, you control every step. You select fresh, high-quality roots and avoid the fillers, artificial colors, and anti-caking agents sometimes found in commercial powders. This ensures you're getting 100% pure turmeric, rich in its active compound, curcumin.
- Superior Flavor and Aroma: Freshly ground spices always boast a more intense flavor and captivating aroma than their pre-packaged counterparts. The difference is palpable, adding a new dimension to your cooking.
- Economic Advantage: While the initial purchase of fresh turmeric roots might seem like an investment, a small amount can yield a significant quantity of powder, proving more cost-effective in the long run, especially if you use turmeric regularly.
- Empowering Self-Sufficiency: There's immense satisfaction in creating something from scratch. Knowing you’ve crafted your own healthy spice from raw ingredients is a deeply gratifying experience.
- Extended Shelf Life: Properly prepared and stored homemade turmeric powder can last for months, sometimes even up to a year, ensuring you always have this golden staple on hand. For a deeper dive into its longevity, check out our guide on DIY Homemade Turmeric Powder: Healthier, Flavorful & Lasts a Year.
Gathering Your Essentials: What You'll Need
Before you embark on this golden journey, ensure you have the following tools and ingredients ready:- Fresh Turmeric Roots: Look for firm, plump roots without blemishes or soft spots. The fresher, the better!
- Sharp Knife and Cutting Board: For preparing the roots.
- Vegetable Peeler: Optional, but helpful for peeling.
- Gloves: Turmeric stains! Disposable gloves will save your hands from a golden tint.
- Blender or Food Processor: A powerful mixer is ideal, especially if you plan to grind dried pieces. Any Indian mixer or a strong blender will work for grinding the paste.
- Large Plates or Trays: For spreading the turmeric paste to dry.
- Fine Mesh Sieve: To achieve a smooth, lump-free powder.
- Airtight Storage Container: For preserving your finished powder.
- Optional: Large pot for boiling, dehydrator, or oven for alternative drying.
The Step-by-Step Guide: Crafting Your Golden Powder
There are a couple of effective methods to produce turmeric powder from fresh roots, each with its own advantages. We'll explore both, starting with the direct approach. For more simple guidance on the process, you might find How to Make Fresh Turmeric Powder at Home: A Simple Guide helpful.Method 1: The Fresh Grind & Sun Dry Approach
This method is straightforward, relying primarily on the sun's natural drying power.Step 1: Clean and Prepare Your Roots
Begin by thoroughly washing your fresh turmeric roots under running water. Use a brush to remove any lingering dirt. Next, it's time to peel. While some prefer to keep the skin on, peeling results in a finer, purer powder and can prevent any slight bitterness. Use a vegetable peeler or a sharp knife to carefully remove the outer skin. Be mindful that turmeric can stain, so wearing gloves is highly recommended.
Once peeled, chop the roots into small, uniform roundels or pieces. Smaller pieces will grind more easily and dry faster.
Step 2: The Initial Grind
Transfer the chopped turmeric pieces to your blender or food processor. Grind them into a coarse paste. If your blender struggles, you can add a tiny amount of water – just enough to help the blades move, but not so much that it becomes watery. A thick, gritty paste is what you're aiming for. If you do add water, drain any excess liquid into a small bowl; this highly concentrated turmeric water can be used immediately in cooking or even to color rice.
Step 3: The Sun's Embrace: Drying the Paste
Spread the thick turmeric paste thinly and evenly across large plates or trays. The thinner the layer, the faster and more thoroughly it will dry. Place these trays in a sunny, well-ventilated area. Ideally, you want direct sunlight for several hours a day. Cover the trays with a thin mesh or cloth to protect them from dust and insects.
Allow the paste to sun dry for one to two days, or even longer, depending on your climate and humidity. The key is for it to be completely dry – brittle to the touch, with no moisture remaining. During this process, the paste will harden, and its outer layer might turn a deeper brown or orange color. Turn the pieces occasionally to ensure even drying.
Alternative Drying Methods:
- Dehydrator: If you have a food dehydrator, spread the paste thinly on dehydrator trays. Set the temperature to around 100-115°F (38-46°C) and dry until brittle, which can take 12-24 hours.
- Oven: For those without a dehydrator or consistent sunlight, an oven can work. Spread the paste on a baking sheet lined with parchment paper. Set your oven to its lowest temperature (usually around 150-200°F or 65-93°C) and prop the door open slightly to allow moisture to escape. Dry for several hours, checking frequently, until completely brittle. This method requires constant vigilance to prevent burning.
Step 4: The Final Transformation
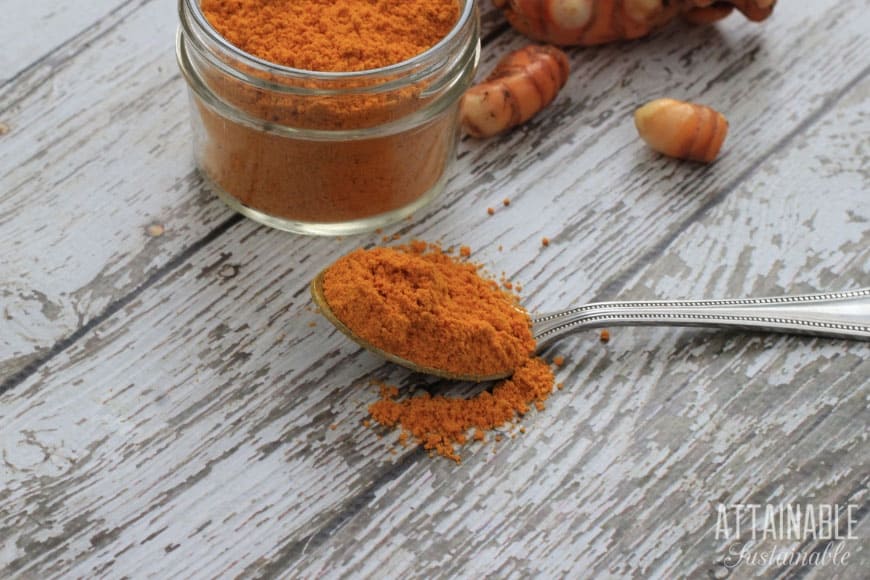
Once the dried turmeric paste is completely hard and brittle, break it into smaller pieces if necessary. Transfer these dried pieces back into your powerful blender or food processor. Grind them to a very fine powder. You might need to do this in batches to avoid overheating your appliance.
Finally, pass the ground powder through a fine mesh sieve. This step ensures a smooth, uniform texture, removing any larger, unground particles. You can re-grind any coarser bits that remain in the sieve until everything is finely powdered.
Method 2: The Boil-First Technique
This variation is excellent if you find peeling challenging or want to soften the roots for easier grinding.Step 1: Boil and Soften
Wash the fresh turmeric roots thoroughly. Unlike Method 1, you don't need to peel them at this stage. Chop them into chunks and place them in a pot. Cover with water and bring to a boil. Reduce heat and simmer for 15-20 minutes, or until the turmeric is tender when pierced with a fork. Boiling not only softens the roots but also helps to set the color and make subsequent steps easier.
Step 2: Chop and Grind
Drain the boiled turmeric and let it cool slightly. At this point, the skin will be much easier to remove if you choose to, or you can proceed without peeling. Chop the softened turmeric into smaller pieces. Grind these pieces into a thick, coarse paste in your blender, adding minimal water only if absolutely necessary.
Step 3: Dry, Grind, and Sieve
From here, follow the same drying, grinding, and sieving steps as outlined in Method 1. Spread the paste thinly, dry completely (in sun, dehydrator, or oven), then fine-grind and sieve.
Storage and Longevity: Keeping Your Golden Treasure Potent
Once you've lovingly crafted your homemade turmeric powder, proper storage is crucial to maintain its flavor, color, and potency. Transfer the sieved powder to an airtight glass jar or container. Store it in a cool, dark place away from direct sunlight and humidity. A pantry or cupboard is ideal. Properly stored, your homemade turmeric powder can retain its quality for up to six months to a year. Always use a clean, dry spoon when accessing the powder to prevent moisture contamination.Unleash the Versatility: Ways to Use Your Homemade Turmeric
Now that you know how to make turmeric powder at home, the possibilities are endless! This vibrant spice is not just a culinary delight but also revered for its potential health and beauty benefits.- In Your Cooking: Add a pinch to curries, stews, soups, lentil dishes, and rice for its distinct flavor and beautiful color. It’s a staple in many cuisines.
- Golden Milk (Turmeric Latte): Mix with warm milk (dairy or plant-based), a dash of black pepper (which boosts curcumin absorption), and a touch of sweetener for a soothing, anti-inflammatory beverage.
- Smoothies and Juices: Incorporate a small amount into your morning smoothie or fresh juice for an extra health boost.
- Marinades and Rubs: Use it in marinades for chicken, fish, or vegetables, or as part of a dry rub for grilling.
- Beauty Treatments: Create a natural face mask by mixing turmeric powder with honey, yogurt, or chickpea flour for skin brightening and anti-inflammatory effects.
- Natural Dye: Historically, turmeric has been used as a natural dye for fabrics and food coloring.
- Daily Wellness Shots: Combine with ginger, lemon, and a dash of black pepper for a potent wellness shot.
